Carvey is a 300-watt 12,000-RPM spindle suitable for cutting and carving into a variety of wood, wood products, plastics, etc. Carvey can even carve through your material depending on the thickness of your material and the length of the cutting flutes on the bit. How long the carve/cut will take is proportionate to the depth of cut (how many passes), the diameter of the bit (the smaller the bit, the more time it will take to finish), and the density of the material (how fast it can travel). The max dimensions of your piece are 12” wide (X) x 8” deep (Y) x 2.75” tall (Z). |
Sign Up for a Carvey Orientation
This class is designed for you to learn the basics of Easel (the online design software) and the Carvey. Our project together will be for you to design your diploma and then carve it. You may keep it if you wish, but we would welcome it as an addition on our soon-to-be display wall.
We will carve on a 5.875" x 5.875" x .125" mdf tile that has been colored with spray paint. We will carve/etch a very thin layer to remove the paint and expose the dark inner core. We have a variety of painted tiles available and ready for your selection. If you wish for a specific color, you may come in ahead of class to prepare your own using the paint booth (instructions for use are on the side of the booth). Additionally, while at class, you will have the opportunity to paint a new tile for future attendees. This will keep the inventory up, and you get to learn 2 stations in 1 class! You may bring in (and leave) any spray paint that you no longer need. We'll be happy to add it to our inventory!
Before you can register for the class, you will need to complete the design of your diploma. It should take less than 30 min to complete. The section below provides a brief tour of the navigation of the Easel layout as well as the specific requirements for the diploma. After you have finished the design, complete this form, and you will be emailed a code for use when registering for the class. Receipt of the code will allow you to register, and is not the actual registration. Please note that you must register for the class and walk-ins will not be accepted.
Carvey Orientation: Designing Your Diploma
Your Carvey Diploma will need to include: your name, date of the class, and a picture or icon of your choosing.
Open https://easel.inventables.com/ and sign in.
Create an account if you have not already done so.
-
Click “New Project” (Green button on the top-right.)

You should see something like this (website is continually updated and improved so subtle differences may be possible).

Easel Pro
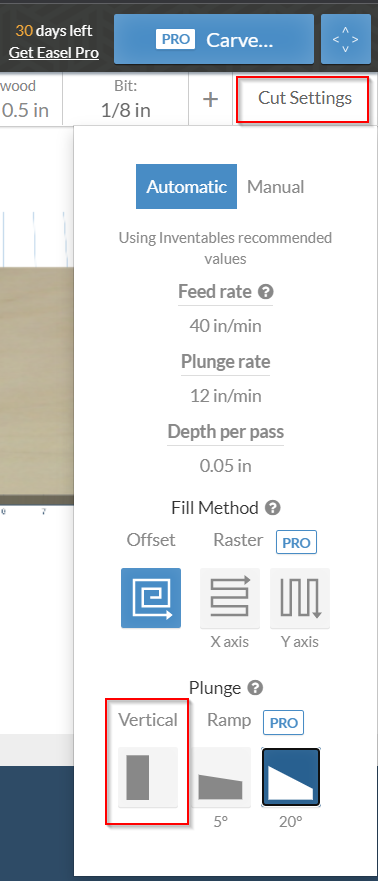
Your new Easel account comes with 30 days of Easel Pro. There are several reasons which will require a Pro Carve. We'll talk more about what that means. But for now, just know that you have full design options both now and after the 30 days expire. The Pro license only applies when you click the Carve button. One of the reasons is set by default and can be found under the 'Cut Settings' menu. You'll observe that the default value is a 20 degree ramp. If/When you change that to Vertical, you'll notice that the 'Pro' no longer appears in the Carve button. And as you continue to design your objects, if you ever insert something that requires Pro, it will add it back to the button. Again, there is no issue for designing, only for when you actually carve. Other common reasons for Pro include a Pro font or inserting a Pro picture from the design library. Since your class is likely within the 30 days, you can carve whatever Pro features you desire. Once you are past the 30 days, make717 has an account with a Pro license. No need to purchase your own Pro license...your membership at make717 includes using ours for free! How to use the pro license at make717
|  |
Design Basics
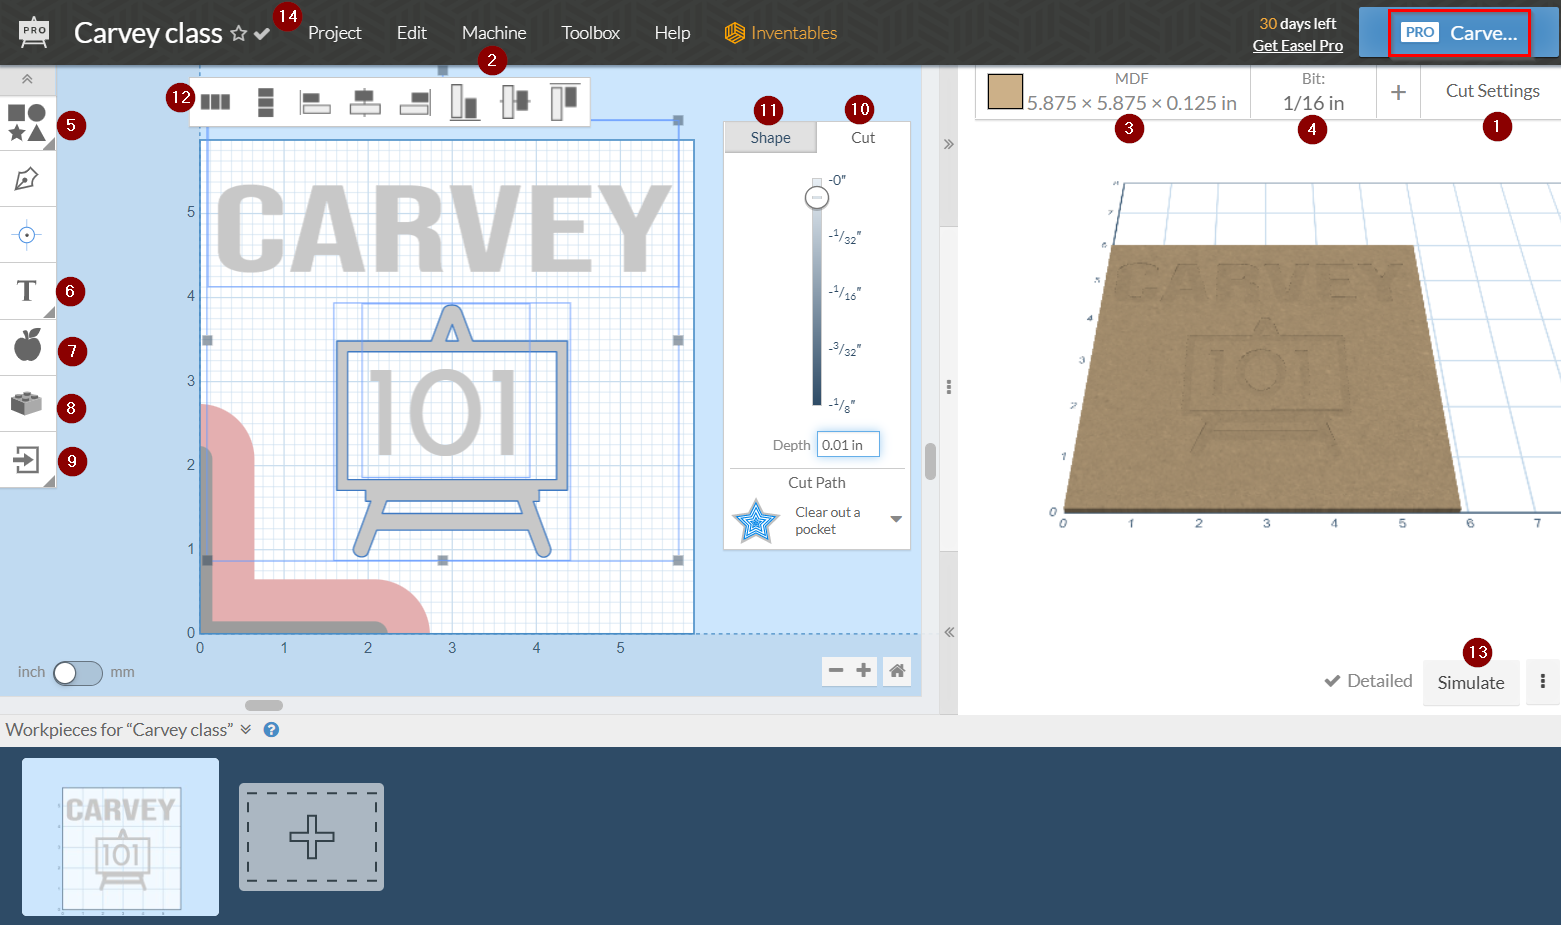
The numbered steps below correspond to the numbered links/locations in the picture above.
I do recommend changing the Plunge settings from 20 degree Ramp to Vertical (shown above) to eliminate the Pro requirement
Set the Machine to Carvey. You will know you are correct when you see the red corner (a no-carve zone) in the lower-left of the design area.
-
You will be designing your Carvey Diploma. Please set the Material Type to MDF and the Material Dimensions to
-
X: 5.875 inches (5 7/8")
-
Y: 5.875 inches (5 7/8")
-
Z: .125 inches (1/8")
-
-
Bit dimensions (recommend either 1/8" or 1/16") depending on the level of detail your design requires.
-
Insert standard Shapes, if desired.
-
The Font selector is pre-loaded with many options. Not all font selections will work with all bit widths. Be sure to click on ‘Simulate’ (Step 11) to see how it renders. Either enlarge text size or reduce bit size for better results. You'll observe many pro fonts to select from. Use them if you wish.
-
The Pro Design Library filled with Icon/Picture selections. Pick something that makes you smile or represents you or import your own (step 9). Keep in mind that the first tab are all Pro shapes and will require a pro license. Use them if you wish!
-
Apps: Powerful options for customizing your carve. Maze generator, box generator, inlays, rubber stamp, etc. Play around to see what you can come up with. Not required for your diploma but great ideas for your next use!
-
Import your own SVG or DXF. Can also convert JPG/PNG but may have mixed results.)
-
With an object selected, set your depth of Cut. For this class, depth only needs to be .01 inches.
-
Click on Shape for additional edits to your shape (size, aspect ratio, angle, font, etc.).
-
With more than one object selected (press and hold shift and click desired shapes), this floating toolbar will appear. This will help with object alignment and spacing. You can evenly space vertical or horizontal as well as align Left/Right/Center/Top/Middle/Baseline.
Simulation for rendering and estimate of carve time.
AND you'll know your creation is saved when this check mark appears.
Reminder: Your diploma will need to include the class’s date, your name, and a picture of your choosing!
Keep in Mind:
Submit your ideas and questions to Carvey@make717.org! |
Buying your own cutting bits:
- make717 has many community bits to use from 1/16" up to 1/8" in diameter. You may use any of the bits. And if you break a bit, just let the MIC know. No worries!
- You may want to purchase your own bits. All of ours have been used, and may not be the sharpest. If you have a specific project, you may get a better end result with a brand new bit.
- Bits can be purchased from Amazon or eBay. When searching for bits, you will need the following:
- 1/8" shank (this is the bit diameter that gets installed in the router)
- Bits with a cutting diameter of 1/32" up to 1/8" are all tested and approved. make717 no longer stocks 1/32" bits since they are the easiest to break.
- Upcut, Downcut and Straight flute bits are all approved (this is the direction of the cutting flutes). Downcut tends to provide a nicer finished carve on plywood
- Endmill is the most common bit. Fishtail will also give you a flat cut. Also approved are Ballnose (round), and V-bits (dimensional, though hard to find on 1/8" shanks. For best results, you may want to consider using the X-Carve pro for your V-bits.)
- If you have any questions about bits, feel free to email carvey@make717.org.
Future carve ideas:
- You can layer your objects and then set an object (your name?) to a 0 depth of cut (#9) to have a negative carve. Additionally, you can choose the cut path (#9): pocket, on shape, inside, or outside.
- Be sure to check out the Apps (#7) for additional ideas and functions for your next carve. Ideas include box maker, inlays, holes on path, and more!
Looking for more?
- Check out these videos by Inventables for more Carvey training, tips, and tricks.
- Check out the user forum for more ideas.
- Check out these project ideas.


